1. Introduction
QuizVerse is an end-to-end, production-ready Quiz and Learning ecosystem. It consists of two seamlessly integrated applications:
- Backend Admin Panel (Laravel 12): Features an interactive Web Installation Wizard, RESTful API endpoints, secure database management, user authorization, question management, coin economy, and real-time app settings.
- Mobile Application (Flutter 3.x): Cross-platform iOS and Android app featuring Quiz Zone, Audio Quiz, Daily Quiz, Math Mania, Battle 1v1 Zone, Live Contests, Exam Module, Leaderboards, and AdMob/In-App Purchases.
📁 Item Package Contents
When you extract your purchased QuizVerse package, you will see the following directory structure:
QuizVerse_Package/
├── admin-panel-v1.0.3.zip     # Laravel 12 Backend API & Web Installer Zip
├── quizverse-app-v1.0.3/       # Complete Flutter Cross-Platform Mobile Application Source Code
└── documentation.zip          # Setup Documentation & User Guides
2. Admin Panel
Introduction
The QuizVerse Admin Panel is built on Laravel 12. It includes a step-by-step GUI Web Installation Wizard designed specifically so non-technical buyers can install the application without running terminal commands.
When you visit your domain URL for the first time, QuizVerse automatically opens the graphical Installation Wizard at https://your-domain.com/install to guide you through database setup, admin account creation, and Envato license activation.
Prerequisites
Before installing the Admin Panel on your web hosting (cPanel, DirectAdmin, or VPS), ensure your server satisfies the following requirements:
| Requirement | Required Version | Details & Extensions |
|---|---|---|
| PHP Version | PHP 8.3.0+ | Required extensions: pdo_mysql, openssl, mbstring, gd, fileinfo, curl, xml, ctype. |
| Database Engine | MySQL 8.0+ / MariaDB 10.5+ | Character Set: utf8mb4_unicode_ci (required for full emoji support). |
| Web Server Root | Apache 2.4 / Nginx / LiteSpeed | Document Root MUST point to the admin-panel/public/ directory. |
| Folder Permissions | Writable (775 or 777) | The installer requires write access to storage/ and bootstrap/cache/. |
QuizVerse is powered by Laravel 12, which requires a minimum of PHP 8.3.0. In cPanel, go to MultiPHP Manager to set your domain PHP version to 8.3 before starting setup.
Installation
QuizVerse offers two flexible installation paths: the Web Installation Wizard (recommended for all buyers) or the Manual CLI Method (for developers).
⭐ Method 1: Web Installation Wizard Flow (Recommended)
Follow these step-by-step visual screens to set up QuizVerse directly in your web browser:
Upload the contents of admin-panel/ to your server directory (e.g., /public_html/admin/).
CRITICAL: In cPanel Domains / Subdomains manager, set your Document Root to point to admin-panel/public.
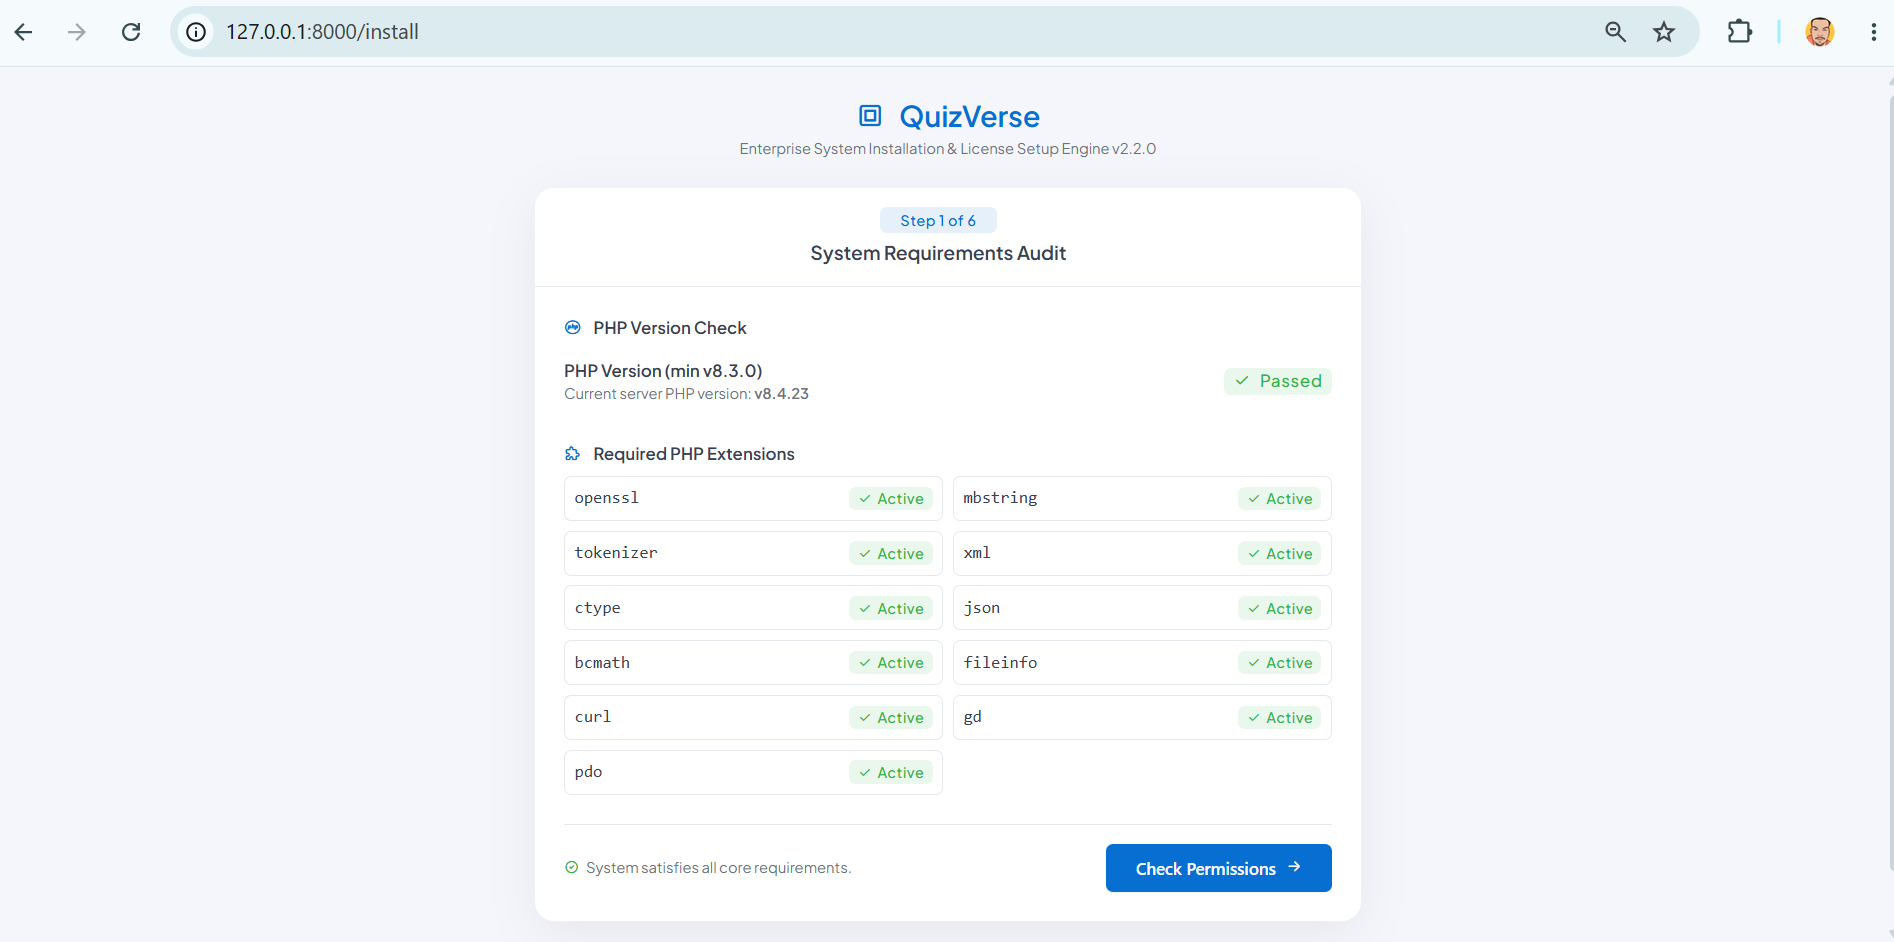
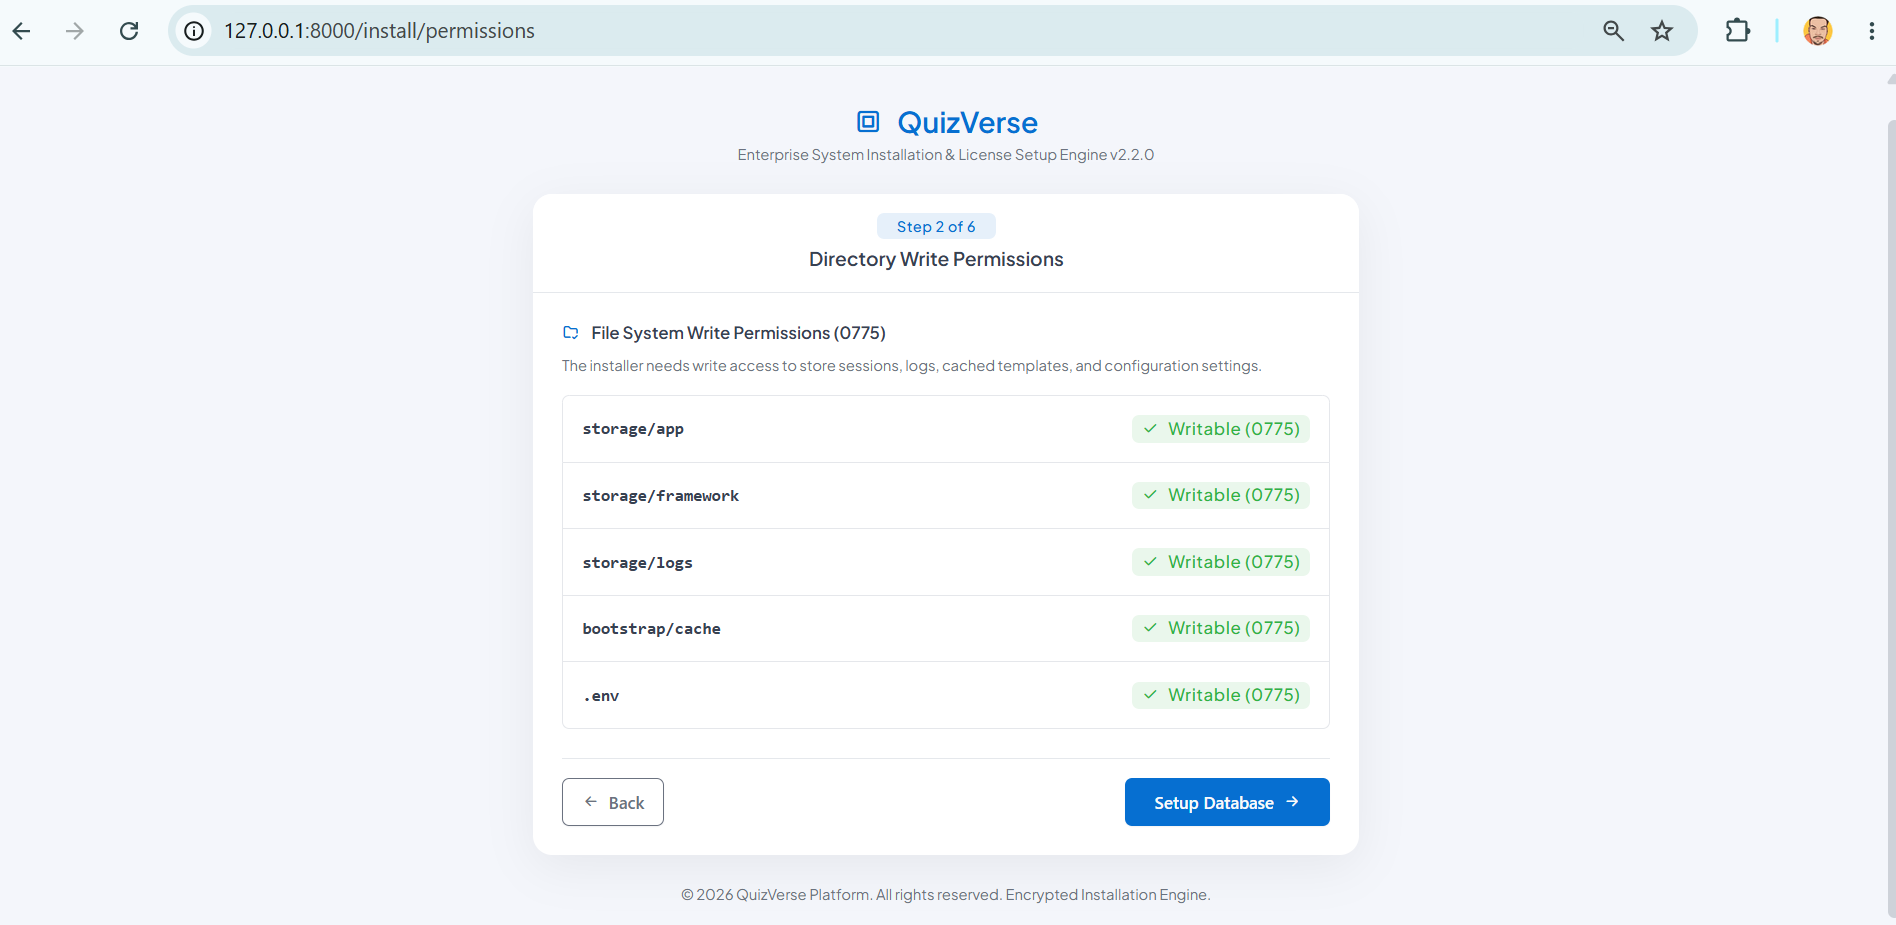
Open https://your-domain.com/install in your browser. The wizard automatically checks your server for PHP 8.3+ and required PHP extensions, as well as write permissions for storage/ and bootstrap/cache/.
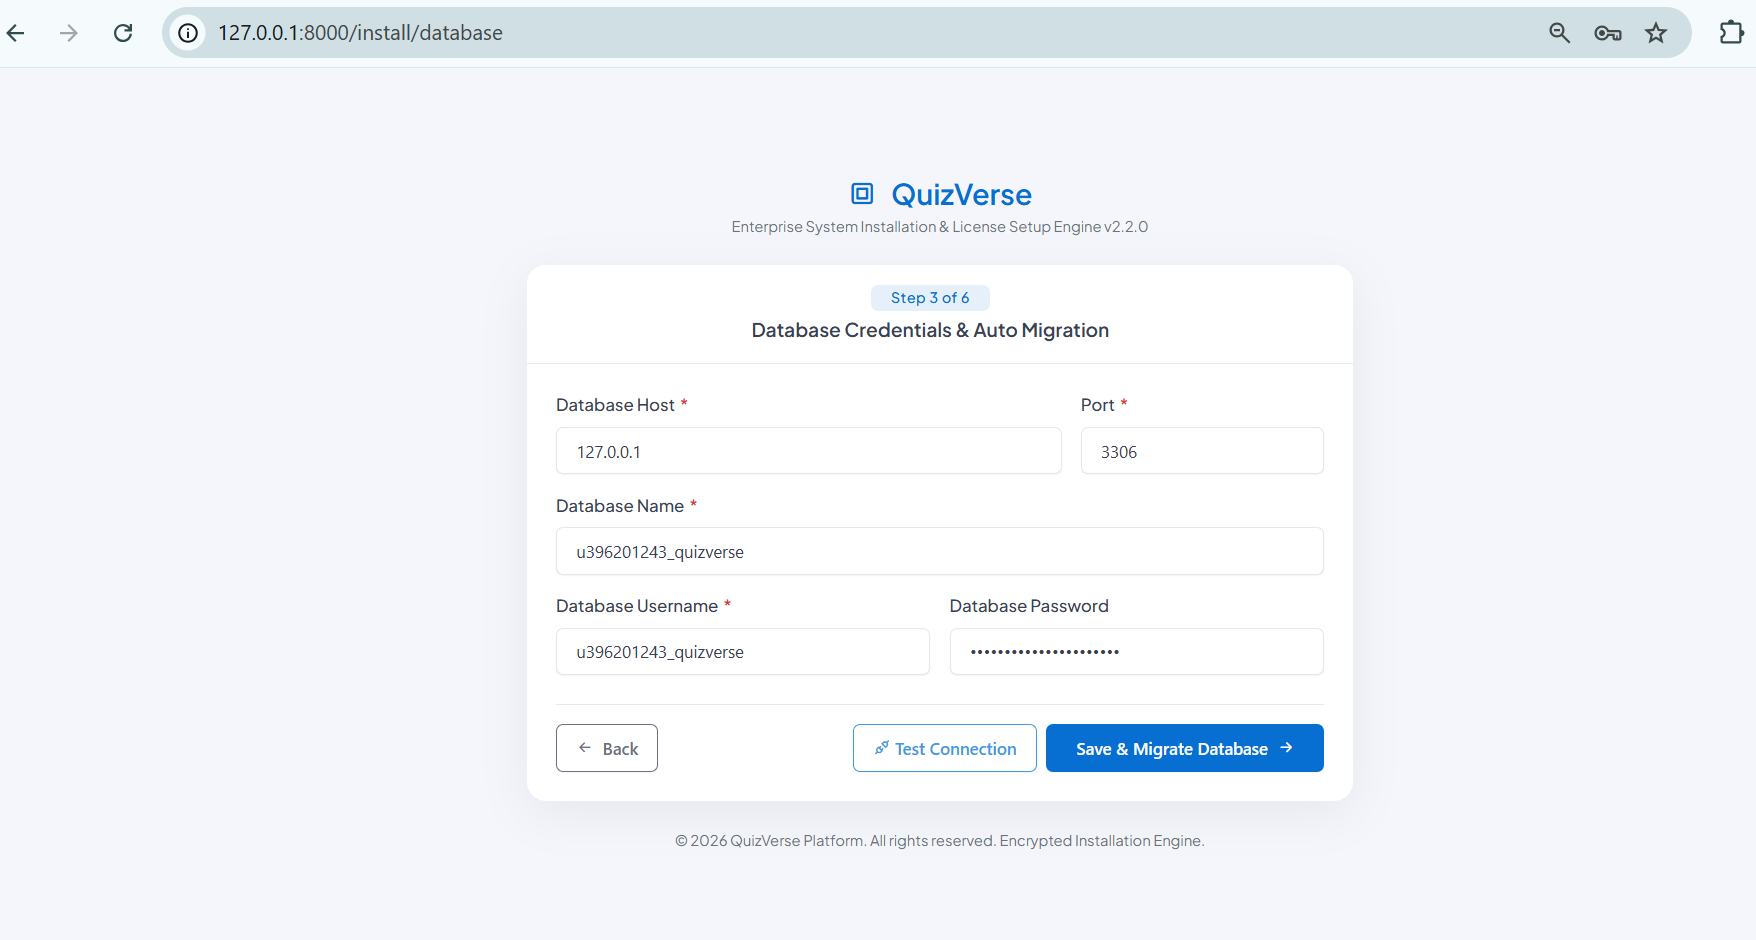
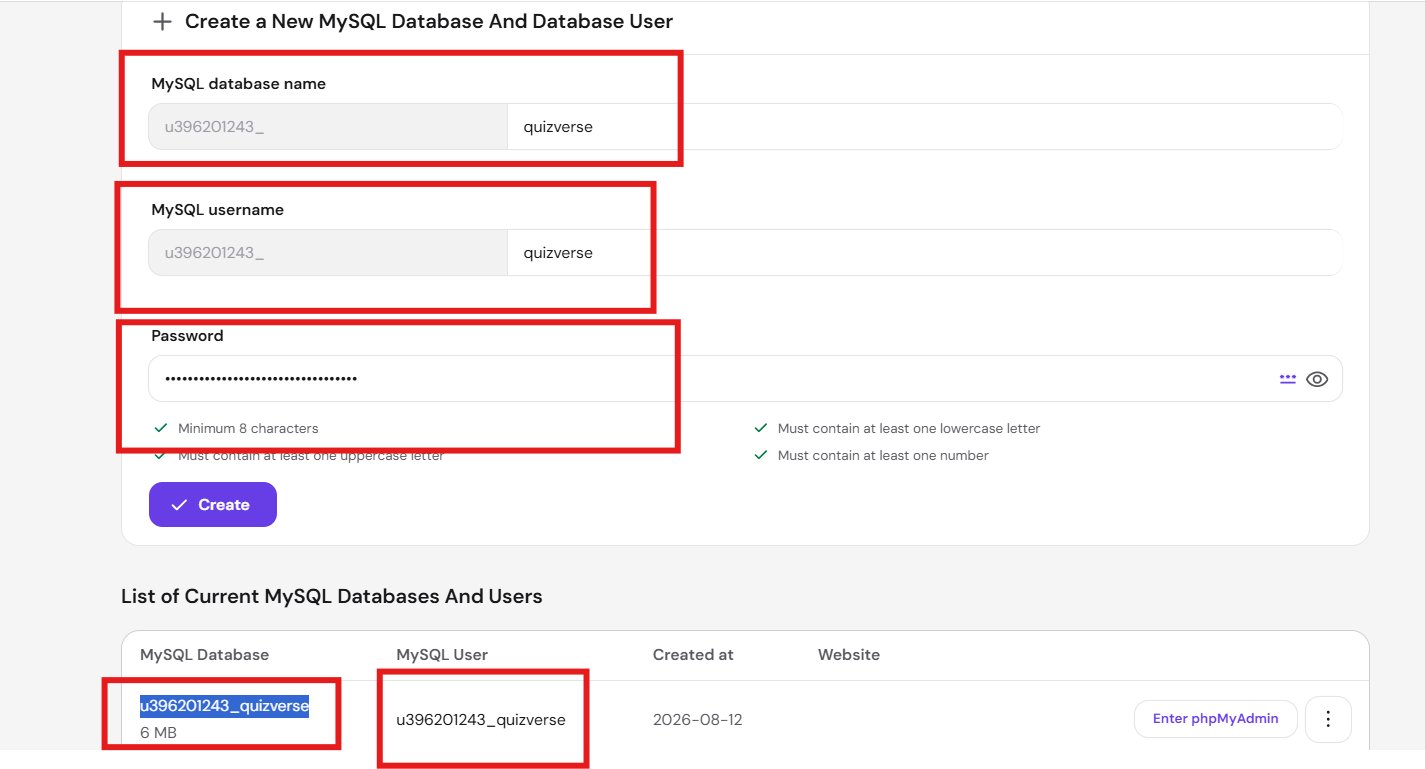
Enter your cPanel MySQL Database credentials (Database Host, Database Port, Database Name, Username, and Password):
Click Test & Setup Database. The wizard will automatically connect to your database and begin creating all required tables:
Once table creation completes, the wizard automatically populates default application configurations, system permissions, and initial sample data into your database:
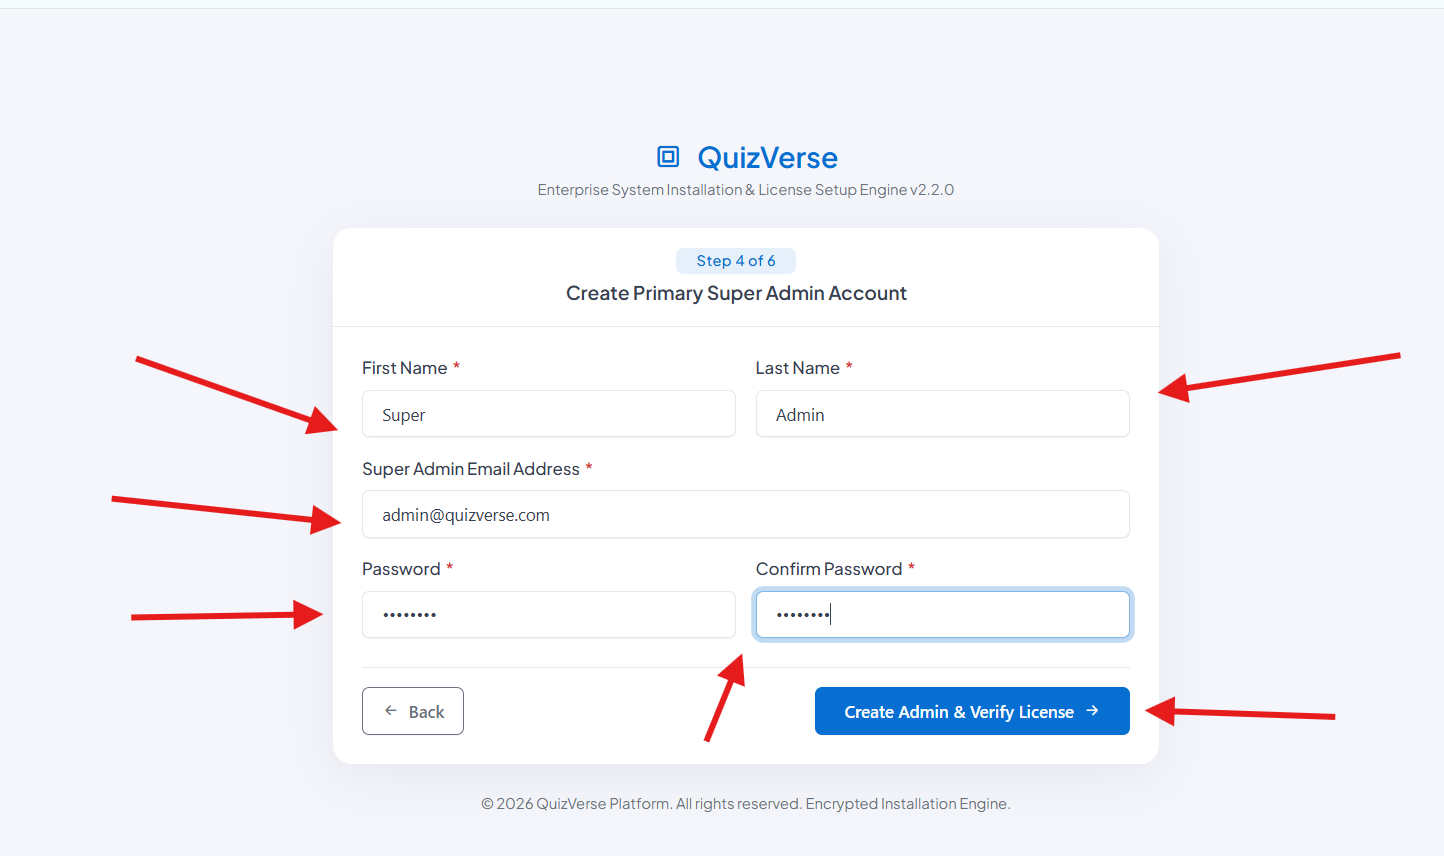
Fill out the Super Admin setup form with your preferred Name, Email Address, and Password. This will become your primary administrator login.
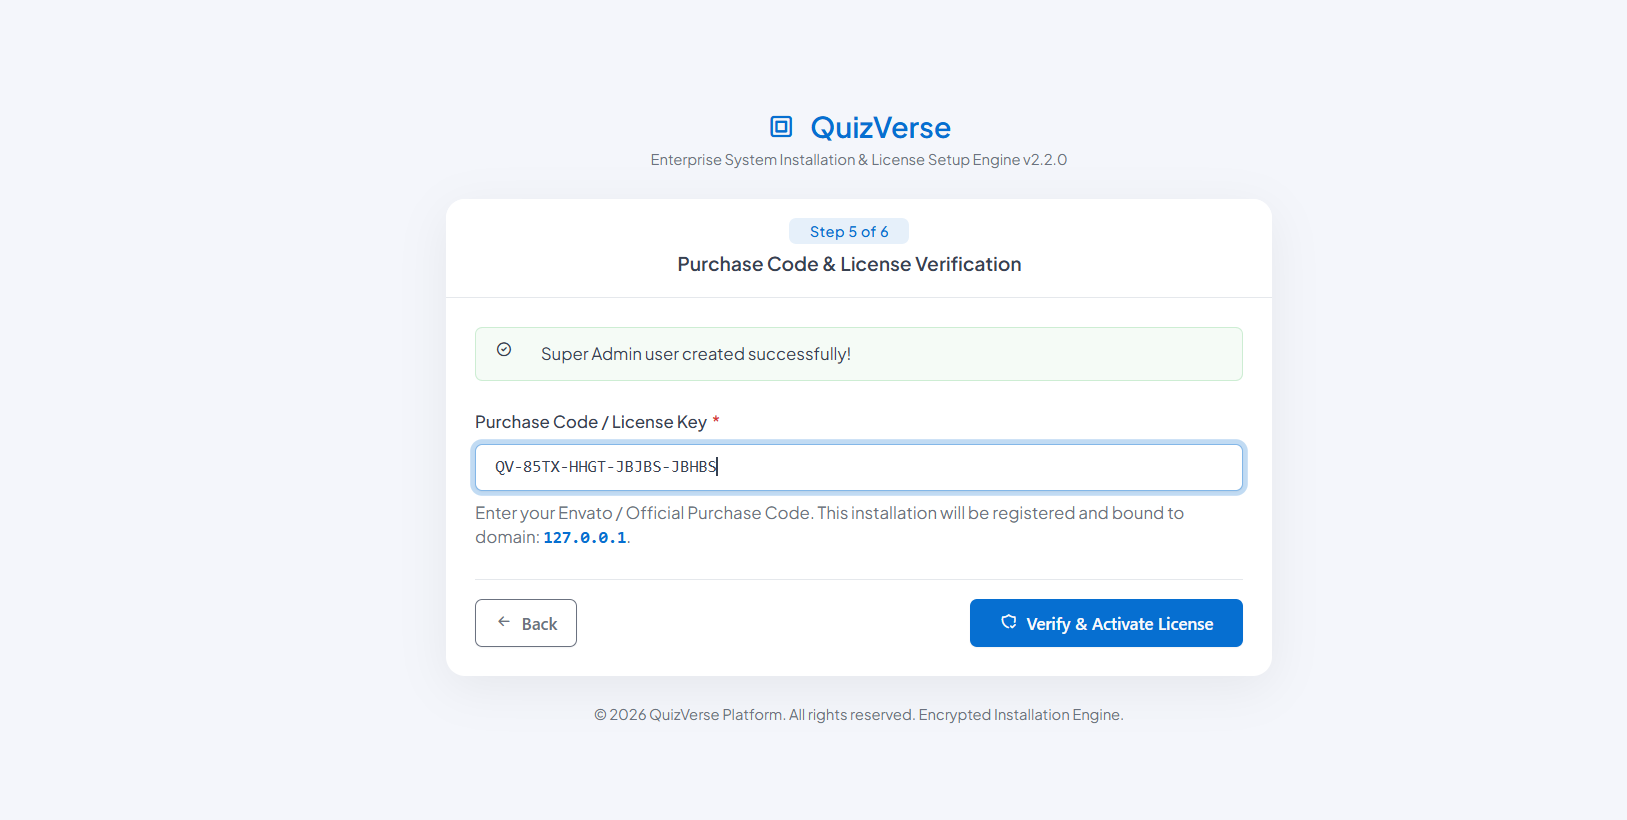
Enter your Envato Purchase Code and Envato Username. Click Verify & Activate License.
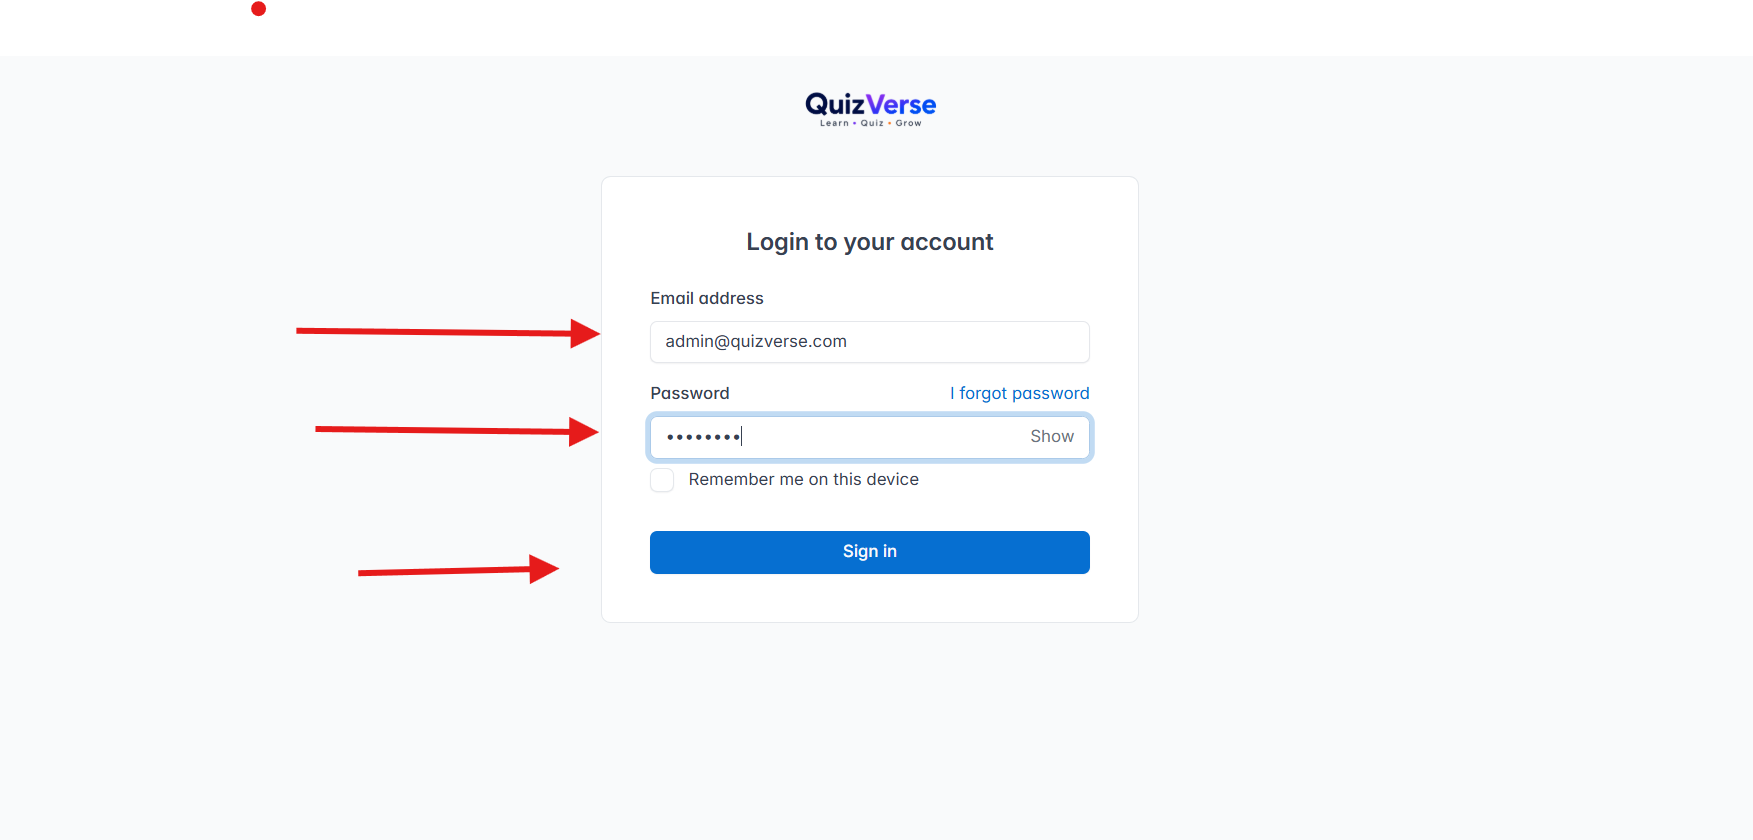
Click Launch Admin Panel to sign in to your live administration interface at https://your-domain.com/admin/login!
Your Admin Panel setup is now completed. You can now log in to your Administration Panel and start managing your QuizVerse platform.
💻 Method 2: Manual CLI Installation (For Developers)
If you prefer deploying via SSH terminal or command line, execute the following commands:
# 1. Install backend dependencies
composer install --no-dev --optimize-autoloader

# 2. Copy environment file and generate application key
cp .env.example .env
php artisan key:generate

# 3. Configure DB credentials in .env then run migrations & seed data
php artisan migrate --seed

# 4. Create public storage symlink for uploaded images
php artisan storage:link

# 5. Optimize configuration for production speed
php artisan optimize
3. Mobile App
Overview
The QuizVerse mobile application is built using Flutter 3.x (Dart 3.x), offering native 60fps performance on both iOS and Android from a single codebase.
Key app capabilities include:
- Quiz Modules: Quiz Zone (Categories & Levels), Daily Quiz, Audio Quiz, Math Mania, Fun & Learn, Guess the Word, Exam Mode.
- Battle Zone: 1v1 Real-Time Battle, Group Battles, and Bot support.
- Auth Systems: Email/Password, Google Sign-In, Phone OTP, Apple Sign-In, and Firebase Authentication.
- Monetization: Google AdMob (Banner, Interstitial, Rewarded) and In-App Purchases (Coins & VIP Memberships).
Flutter Setup
Follow these steps to configure, brand, and build your Flutter mobile app:
Open quizverse-app-v1.0.3/ in Android Studio or VS Code. Run:
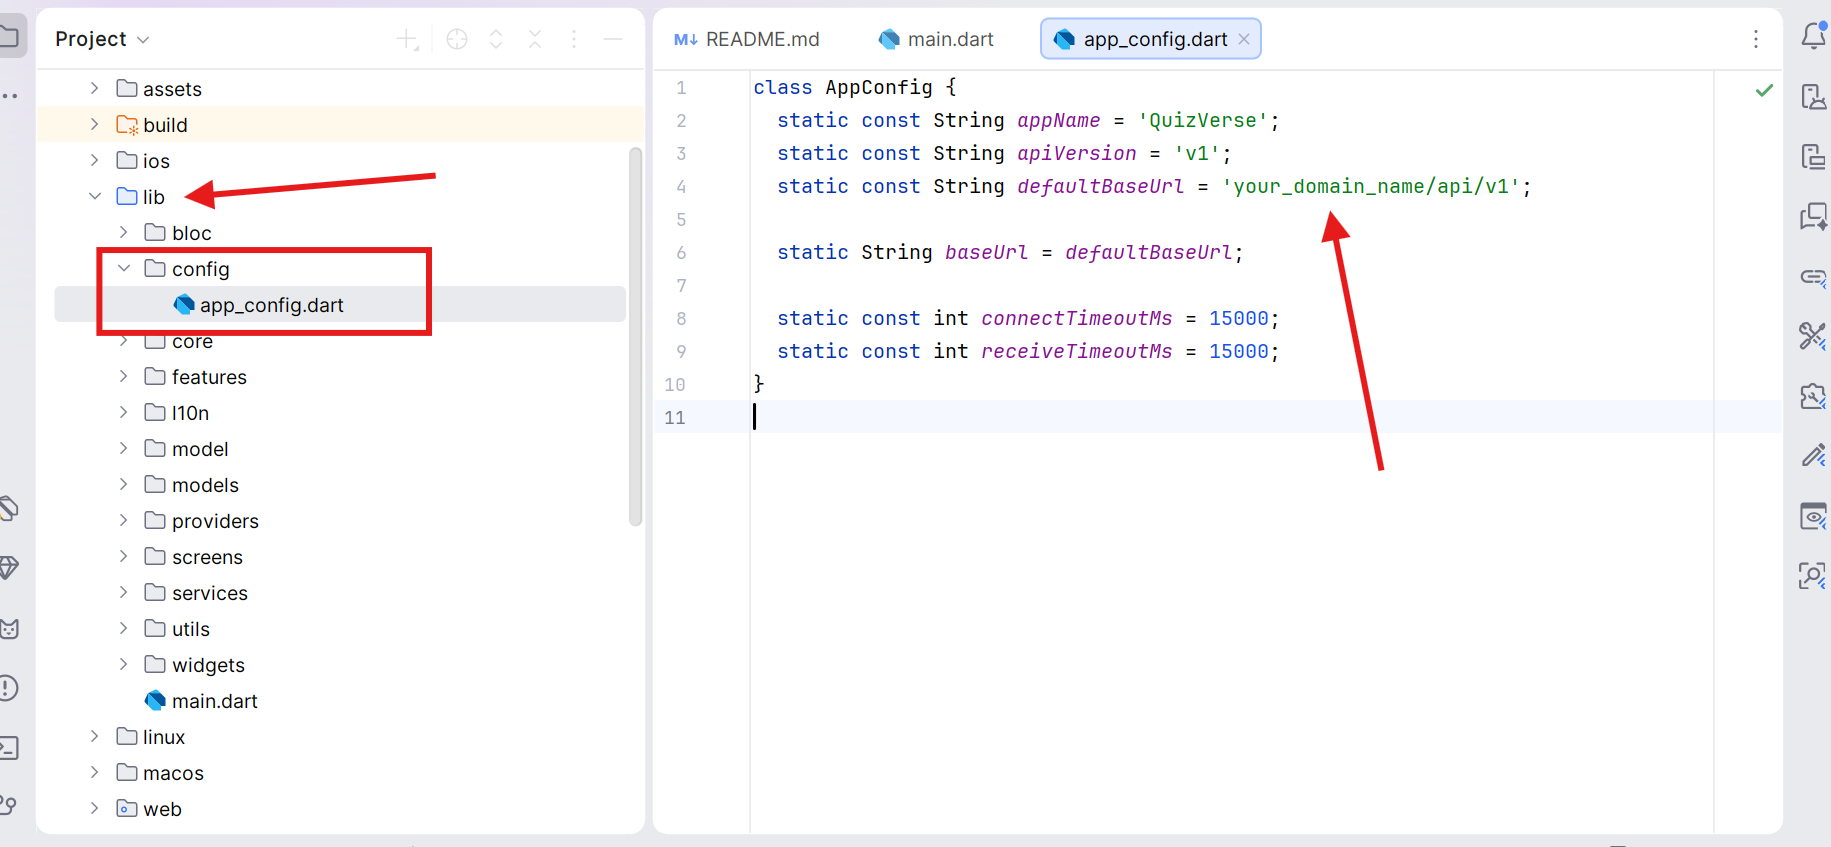
flutter pub getOpen lib/config/app_config.dart and set defaultBaseUrl to your live backend domain:
class AppConfig {
  static const String appName = 'QuizVerse';
  static const String apiVersion = 'v1';

  // REPLACE WITH YOUR LIVE API URL
  static const String defaultBaseUrl = 'https://admin.yourdomain.com/api/v1';

  static String baseUrl = defaultBaseUrl;
}
- Go to Firebase Console ➔ Create a project named
QuizVerse. - Add Android App with your package ID ➔ Download
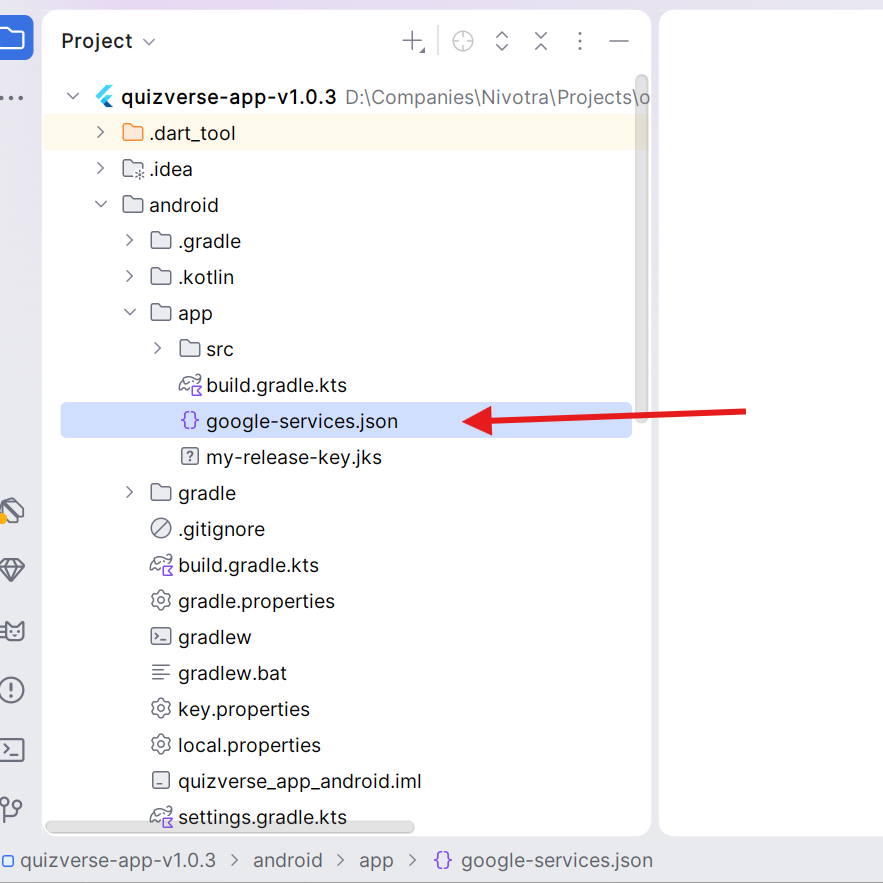
google-services.json➔ Save toquizverse-app-v1.0.3/android/app/google-services.json. - Add iOS App with your bundle ID ➔ Download
GoogleService-Info.plist➔ Save toquizverse-app-v1.0.3/ios/Runner/GoogleService-Info.plist. - Enable Authentication providers (Google, Phone, Apple, Email) in Firebase.
- In Firebase Console ➔ Project Settings ➔ Service Accounts, generate a private key JSON and upload it to your Admin Panel under Settings ➔ Firebase Settings for push notifications.
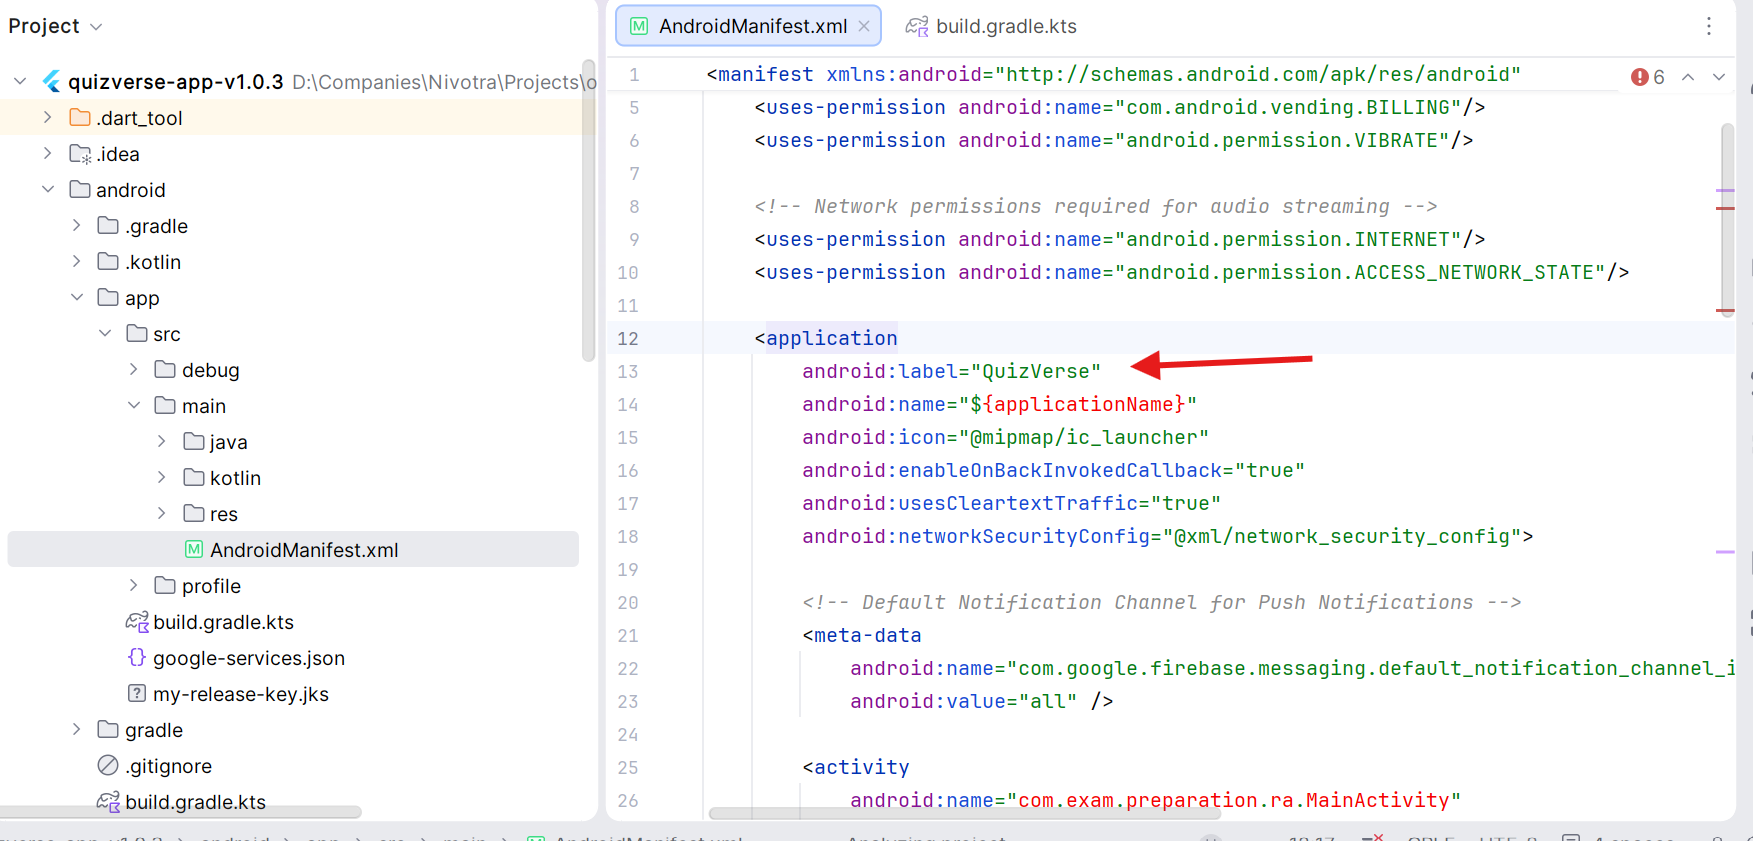
To update the visible app title displayed on smartphone home screens:
- Android: Open
android/app/src/main/AndroidManifest.xmland updateandroid:label="QuizVerse"toandroid:label="Your App Name".
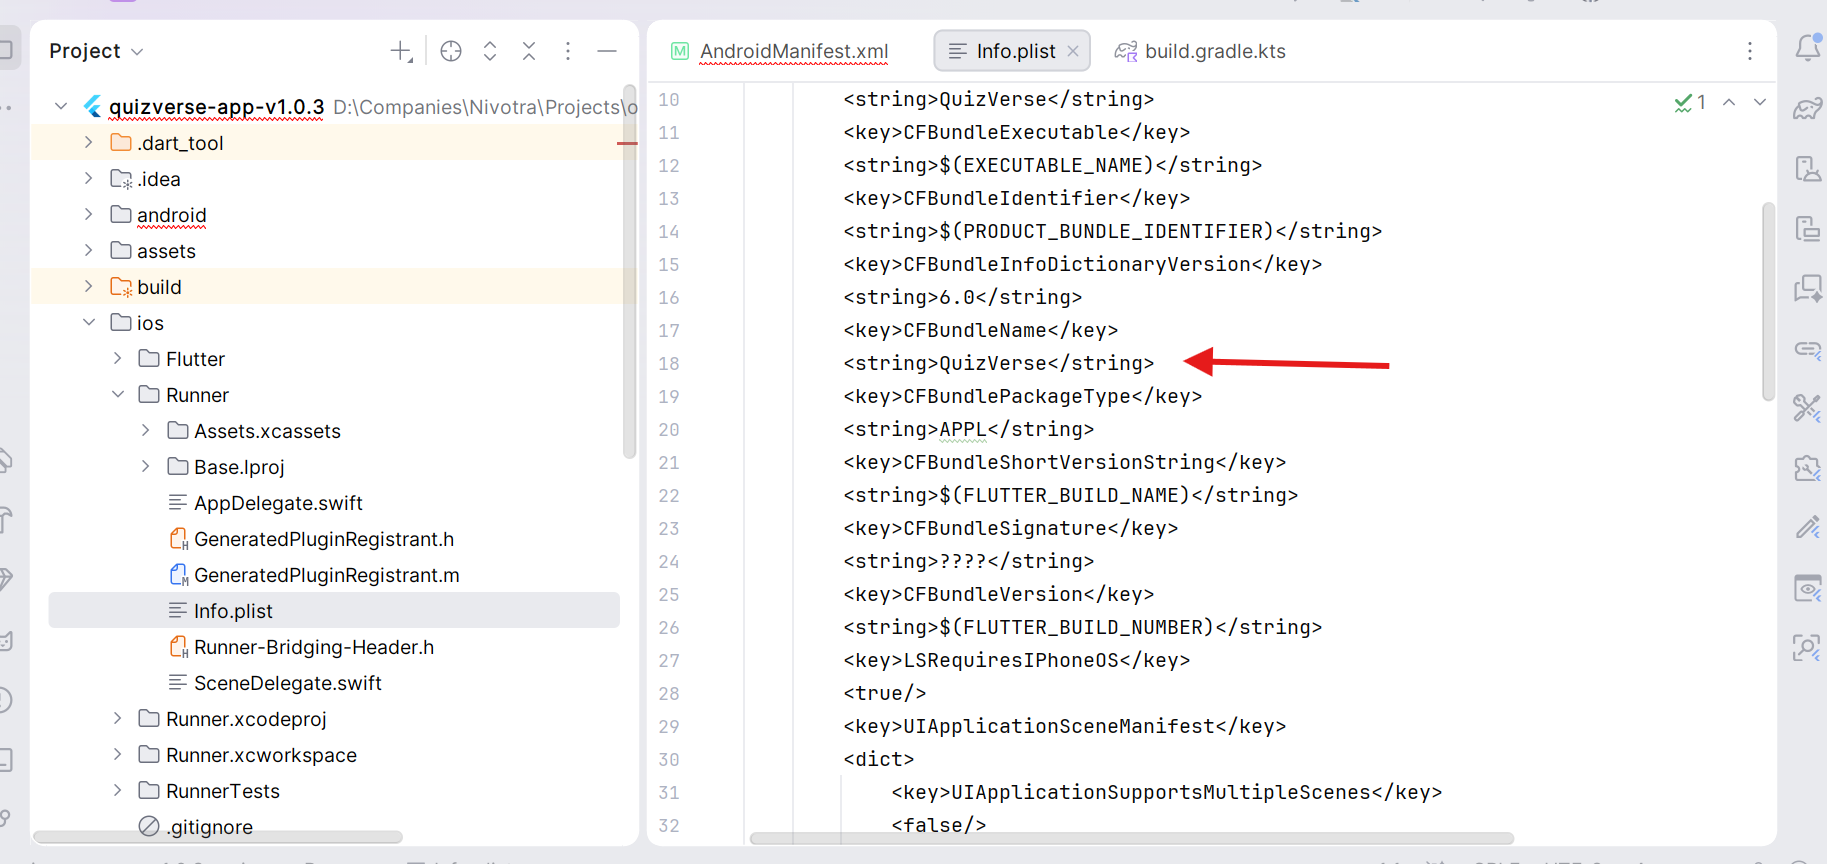
- iOS: Open
ios/Runner/Info.plistand update bothCFBundleDisplayNameandCFBundleNamestring values toYour App Name.
- In-App Config: Open
lib/config/app_config.dartand setstatic const String appName = 'Your App Name';.
To update the app launcher icon and in-app brand logos, replace the logo assets at the following project locations:
- App Launcher Icon: Replace
assets/images/app_launcher_logo/app_launcher_icon.pngwith your custom logo (recommended 1024×1024 px PNG format). - In-App Dark Theme Logo: Replace
assets/images/app_logos/quizverse_dark.png. - In-App Light Theme Logo: Replace
assets/images/app_logos/quizverse_light.png.
Run the automated launcher icon generator commands below to update native Android ic_launcher & iOS app icons:
# 1. Add the flutter_launcher_icons package
flutter pub add --dev flutter_launcher_icons

# 2. Automatically generate native Android & iOS launcher icons (ic_launcher)
dart run flutter_launcher_icons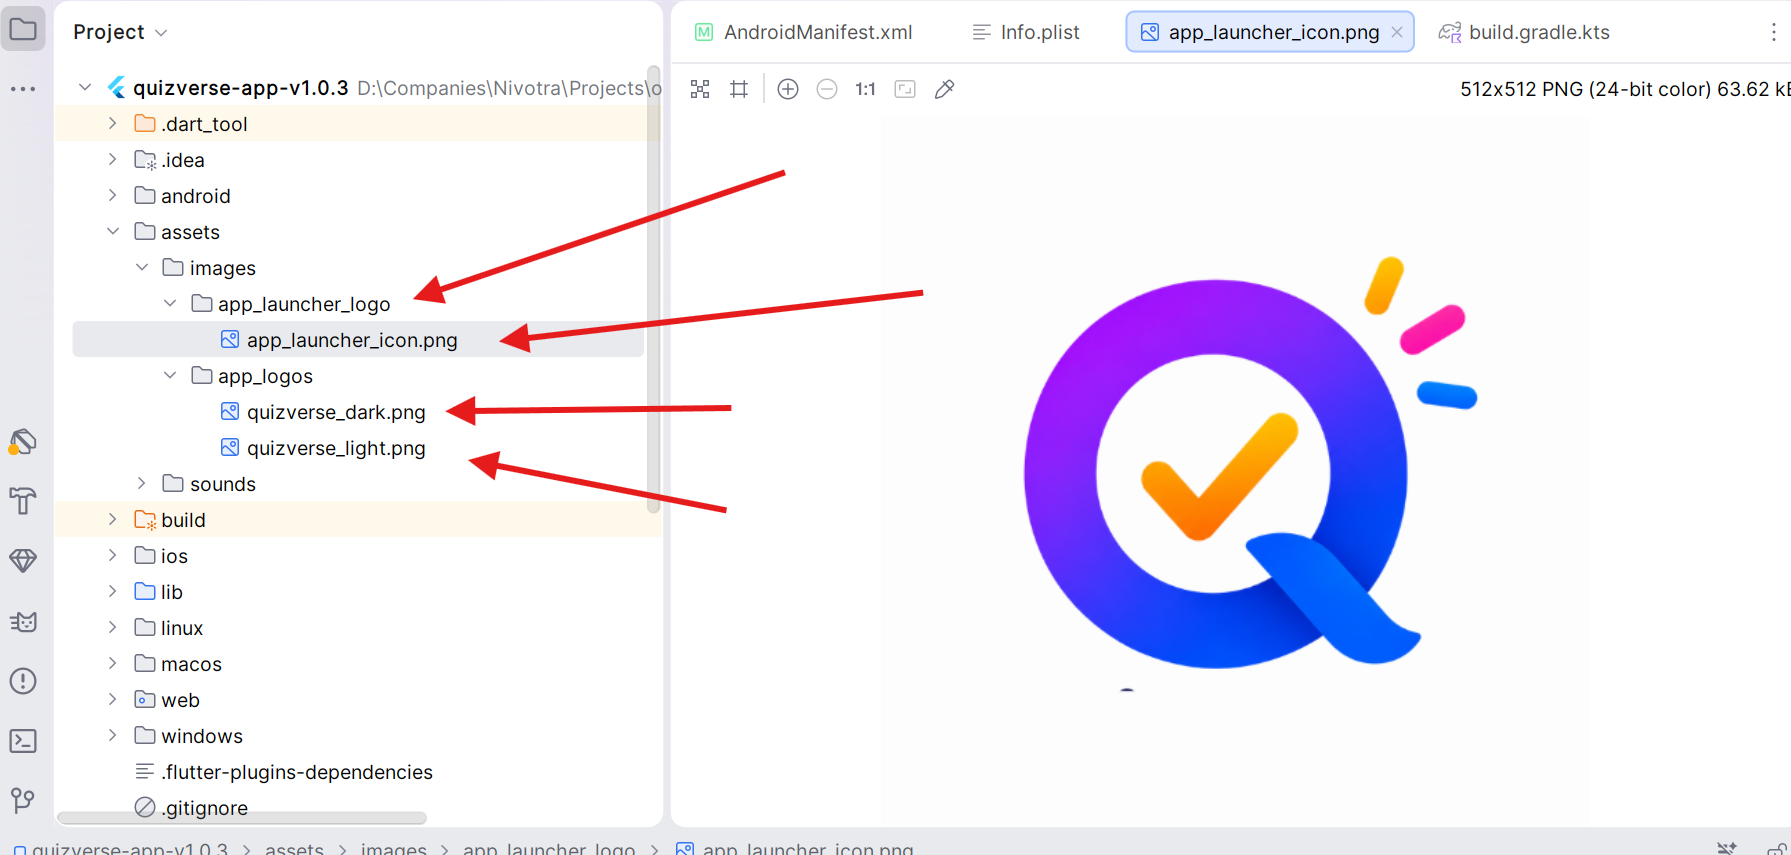
QuizVerse supports full Android 12+ Splash Screen API (generated in android/app/src/main/res/drawable-*/android12splash.png) and iOS native launch screens. To automatically generate and update native splash screen assets across all screen density folders (hdpi, mdpi, xhdpi, xxhdpi, xxxhdpi, and night mode):
- Ensure your splash icon asset is placed at
assets/images/app_launcher_logo/app_launcher_icon.png. - Run the automated native splash generator commands below:
# 1. Add the flutter_native_splash package
flutter pub add --dev flutter_native_splash

# 2. Auto-generate Android 12+ & iOS native splash screens
dart run flutter_native_splash:create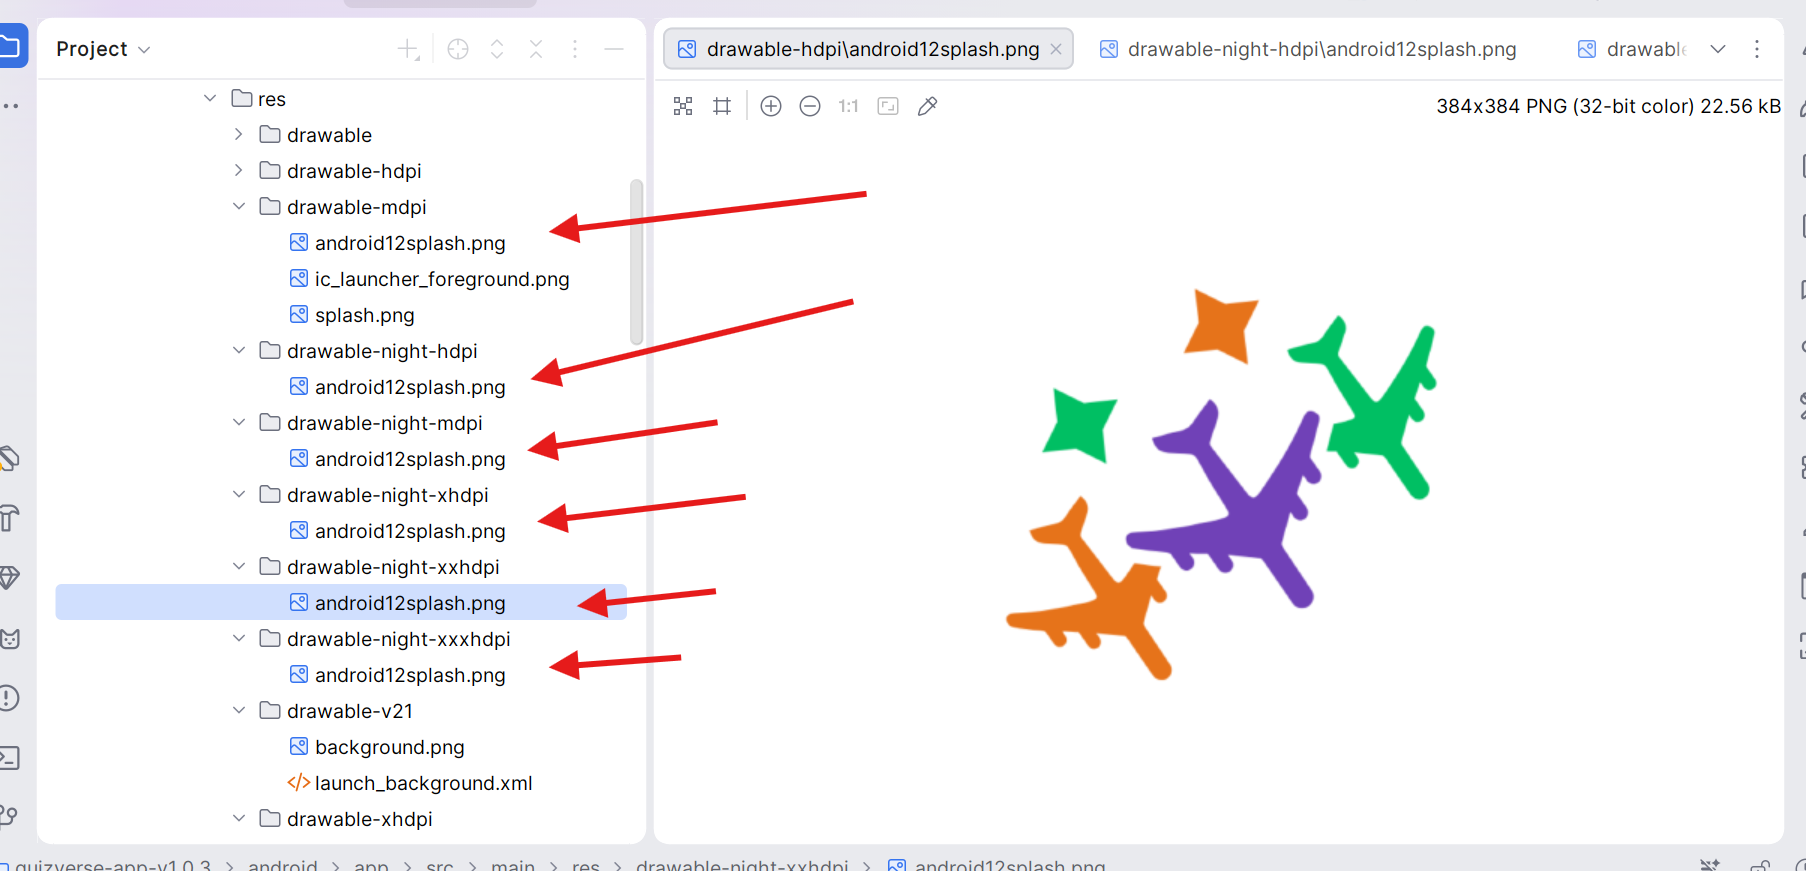
Run the commands below to update your Android Package ID & iOS Bundle Identifier globally (e.g. com.yourcompany.quizverse):
# 1. Add the change_app_package_name dev dependency
flutter pub add --dev change_app_package_name

# 2. Run package rename utility for Android & iOS
dart run change_app_package_name:main com.yourcompany.quizverse
Manual Package Rename (Alternative):
- Android: Update
applicationIdinandroid/app/build.gradleandnamespaceinandroid/app/src/main/AndroidManifest.xml. - iOS: Open
ios/Runner.xcworkspacein Xcode ➔ Select Runner target ➔ Update Bundle Identifier under Signing & Capabilities.
Always keep your created my-release-key.jks keystore file, key passwords, and key.properties safe and backed up in a secure private location (e.g. secure cloud backup or password manager). If you lose your release keystore file or password, you will NEVER be able to push app updates to Google Play Store, and you would be forced to publish a completely new app listing.
Run the keytool command in your terminal to generate your production release keystore file at android/app/my-release-key.jks:
# Generate new release keystore (save to android/app/my-release-key.jks)
keytool -genkey -v -keystore android/app/my-release-key.jks -keyalg RSA -keysize 2048 -validity 10000 -alias upload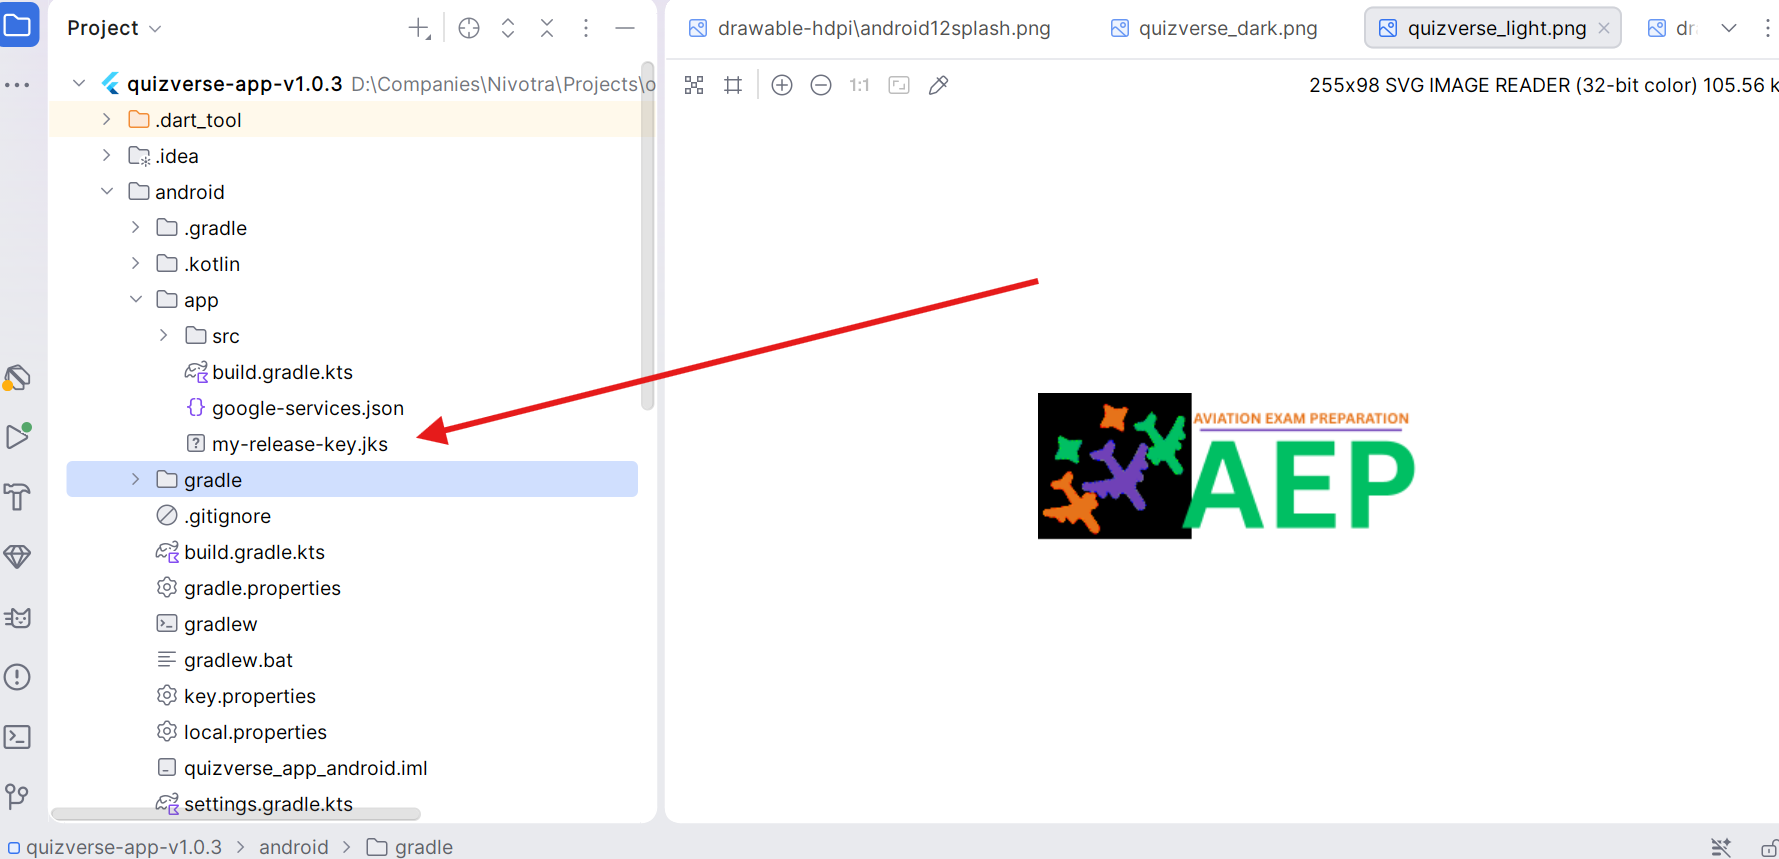
Create a file named key.properties inside the android/ directory and populate it with your keystore credentials:
storePassword=your_password
keyPassword=your_password
keyAlias=your_alias_name
storeFile=my-release-key.jks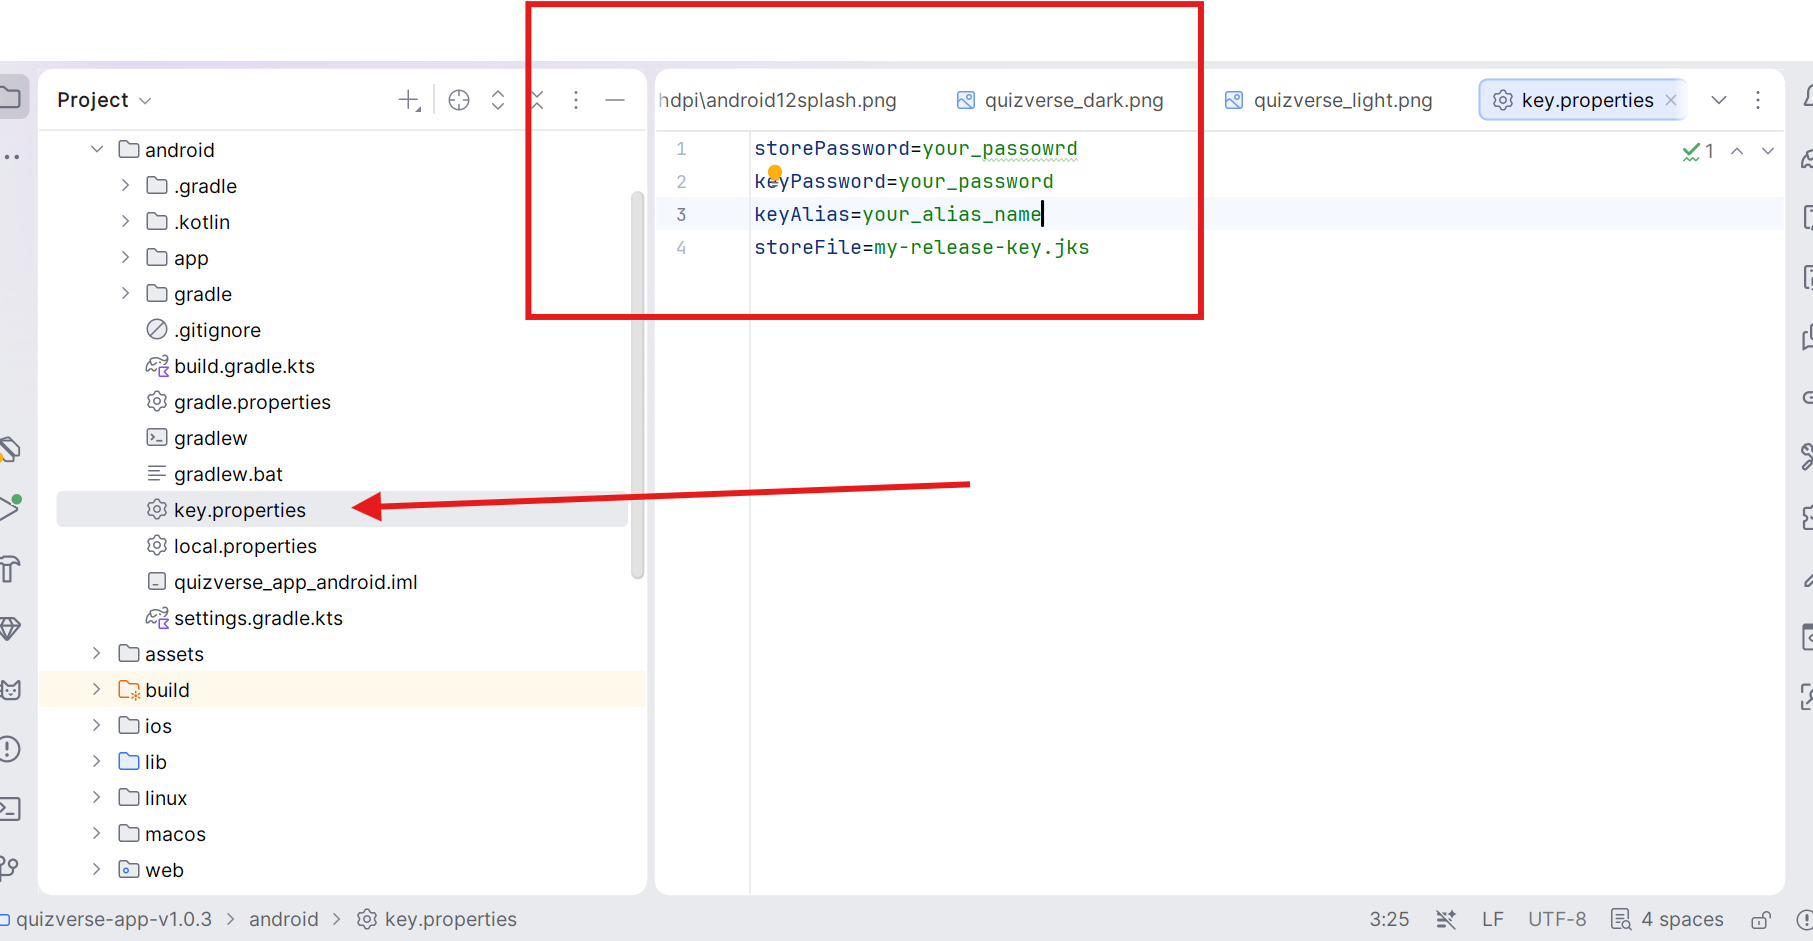
Compile production release binaries for Google Play Store (.aab / .apk) and Apple App Store (.ipa):
# Build Android App Bundle (.aab) for Google Play Store submission
flutter build appbundle --release

# Build universal release APK
flutter build apk --release

# Build iOS Release Package (.ipa)
flutter build ipa --release
4. System Update Guide
QuizVerse features a built-in Safe System Update Manager allowing administrators to perform 1-click platform updates directly from the Admin Panel interface without manual file merging or database scripts.
BEFORE RUNNING ANY PLATFORM UPDATE, TAKING A COMPLETE BACKUP IS MANDATORY!
Always export a full backup of your MySQL Database and download a zip copy of your Server Files prior to applying updates. In the event of server timeouts, hosting provider resource limitations, or custom code overrides, having a backup guarantees you can restore your platform instantly.
⚙️ Server Cron Job Requirement
System updates and background task queues rely on the server scheduler. Before initiating an update, ensure that the Cron Job is configured and running on your web hosting server (cPanel / VPS / Forge):
* * * * * cd /home/username/public_html/admin-panel && php artisan schedule:run >> /dev/null 2>&1
Note: Replace /home/username/public_html/admin-panel with the absolute file path to your backend directory on your server. Set the frequency to Every Minute (* * * * *).
🚀 Step-by-Step Update Process
Go to your cPanel ➔ phpMyAdmin ➔ Select your QuizVerse database ➔ Click Export. Also download a zip copy of your admin-panel directory.
Ensure your server Cron Job is active so background migrations and queue drivers execute smoothly during update deployment.
- Log in to your QuizVerse Admin Panel as Super Admin.
- In the left sidebar, navigate to System Update.
- Under Select Update Package (.ZIP File), click Choose File and select your official update file (e.g.
update-version-latest.zip). - Click Upload & Apply System Update.
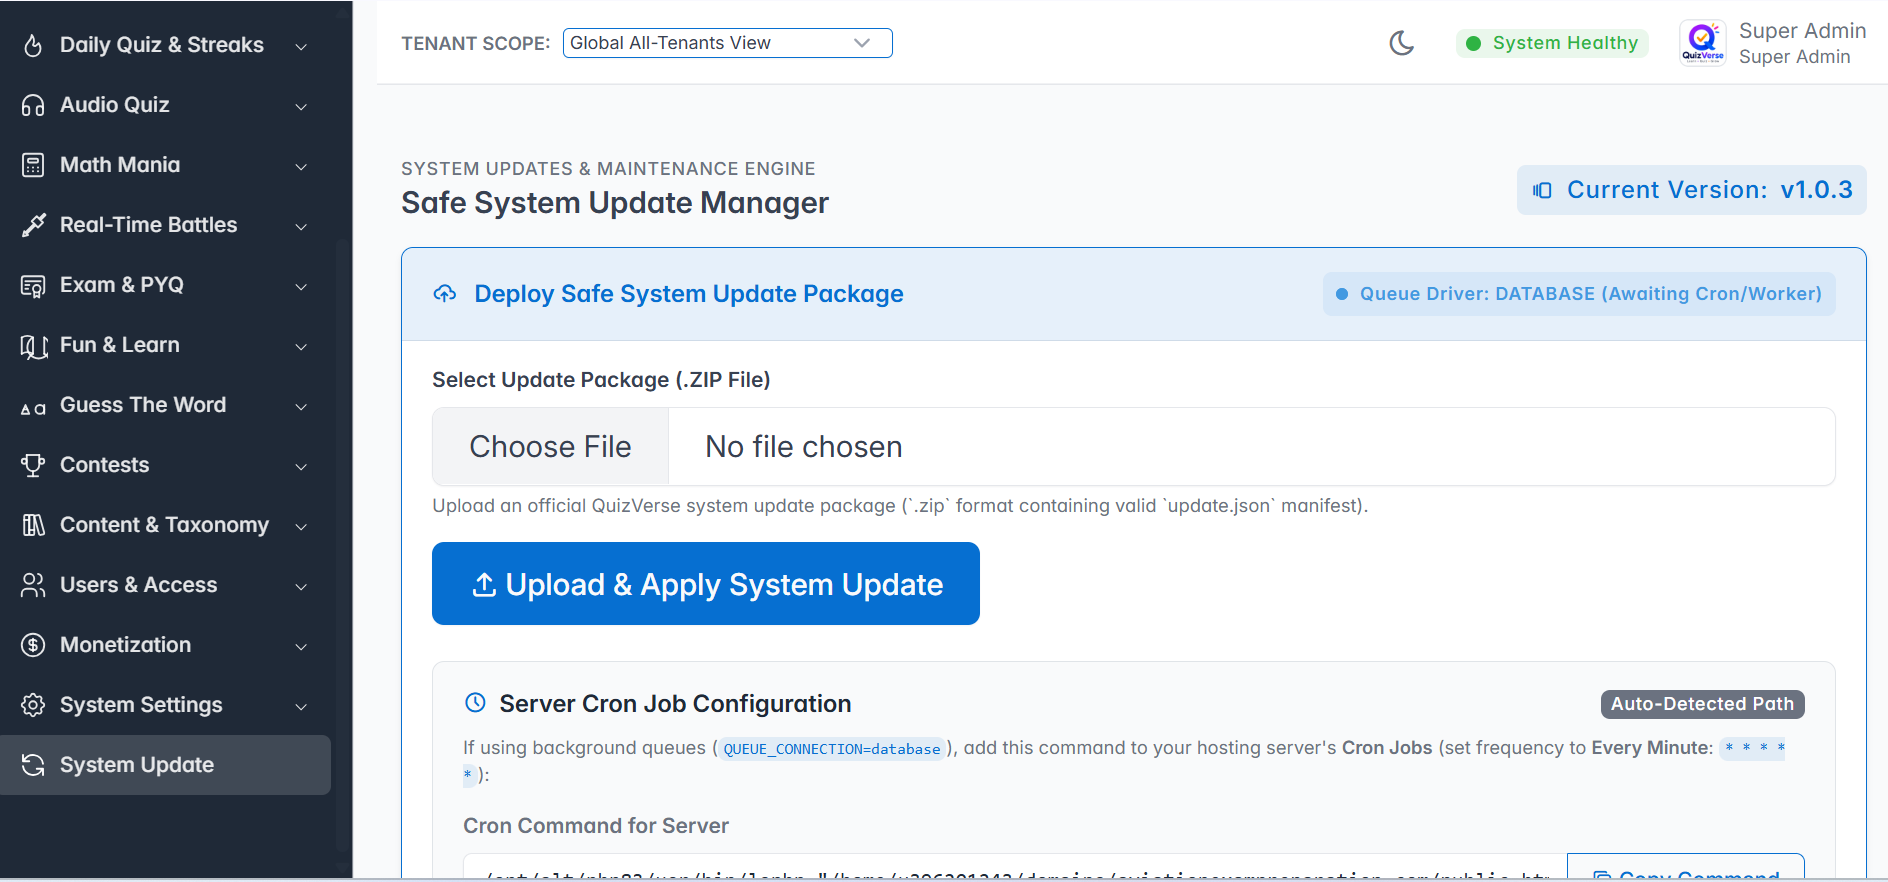
The update engine automatically extracts the update archive, runs database schema migrations, updates version tags, and clears route & application caches. Once complete, your Admin Panel will display the updated version badge!
5. Troubleshooting
Quick solutions to common setup issues encountered during server deployment or app building:
1. Ensure your server is running PHP 8.3 or higher (check MultiPHP Manager in cPanel).
2. Check that folder permissions for storage/ and bootstrap/cache/ are set to 775 or 777.
3. Ensure your domain Document Root points directly to the admin-panel/public folder.
1. Check lib/config/app_config.dart and verify that defaultBaseUrl uses https:// and ends with /api/v1.
2. Verify that your server has a valid SSL certificate (HTTPS).
3. Test opening https://admin.yourdomain.com/api/v1/languages directly in your browser to confirm API responsiveness.
Add your Android app's SHA-1 and SHA-256 fingerprint keys (both debug and release keys from Google Play Console) into your Firebase Project Settings, then re-download google-services.json and place it in android/app/.
Inside quizverse-app-v1.0.3/ios/ directory, run:
pod repo update
pod install
Then rebuild your iOS app using Xcode.
💬 Customer Support
If you encounter any issues not addressed in this guide, our support team is happy to help!
Please include your Envato Purchase Code, server PHP version, and exact error screenshots when opening a ticket for prompt resolution.